The Internal Maintenance work item is a comprehensive template suitable for prescribed work carried out at a location within your own organisation.
Some features are dependent upon your select plan for your account.
Indicates a feature is only available in Standard plan or above.
Indicates a feature is only available in Enterprise plan.
Feature Summary
These are the key features of this type of work item:
 = yes
= yes  = no
= no
- Full Site Address/Location
- Contact Name/Details

- Equipment Information

- Product Information
- Problem Details
- Description of Task

- Action Details

- Link to Agreement/Contract
- Billable via Pricing Policy/Service Level
- Associate to Project
- Requested Schedule Date/Time

- Additional Resource Criteria

- Attached Document (Sent to Mobile)

- Travel Time/Expenses
- Parts/Materials Used

- Break/Fix Coding
- Signature Capture
- Upload Photos/Files from Mobile

- Equipment Collection/Return

To create a new Internal Maintenance work item:
- From any web portal page, look for the “Plus” menu button on the bottom right of the page.

- Click on the Plus button.
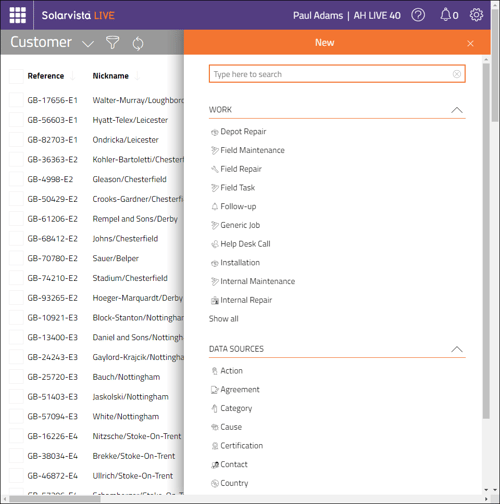
A slide-in pane will appear offering a list of all available types of Work Items and Data Sources to select. If your list is longer than your screen, you can scroll down using the scroll bar, or you can type in search text in the search box at the top of the pane to filter the list. - Click on “Internal Maintenance” item in the Work section.

The pane will display a new Work Item. - All sections are displayed expanded but if you ned to make more space you can collapse a section by clicking on the relevant button to the right of each section header.
-
In the General section, you can choose to manually set a unique “Reference” for the work item, or add tags or a summary “Description” text.
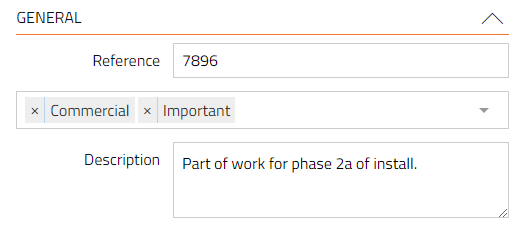
- Work Items are setup to automatically generate a unique Reference (the ID field) for every work item created (you can turn this off by editing the associated template). In most cases, you will not need to enter anything in the Reference field. If you do choose to set manually, it must be unique within the existing range of work items.
- You can add Tags to the work item which provide for easier filtering and searching within Views.
- The Description field is an optional multi-line text field which can be used for any purpose.
- In the Location section, you can choose from a known Site of a Customer or choose to manually enter a site address by overtyping.

-
In the Site field, type text to act as search term and the matching Sites will be displayed in a drop-down picklist below as you type. The search function will look for any matching text within the three fields displayed. The default is Name, Address, City, but if you wish to change the fields that are searched, you need to edit the configuration of the field in the Work Item Template.
-
Select a Site from the picklist by clicking on it. This will populate the following address fields and set the Customer field (the Customer in this case is your organisation only).
- If you wish to manually enter a Site address, you can manually type in the address fields. You can also edit any address retrieved from the Site file too.
- The Customer field is automatically populated as this is taken from the Customer record associated with the Site selected.
-
- In the Contact section, you set the person to be contacted and their communication details i.e. phone, mobile and/or email. These details are automatically set from the primary contact details, if they are set on the Site record.
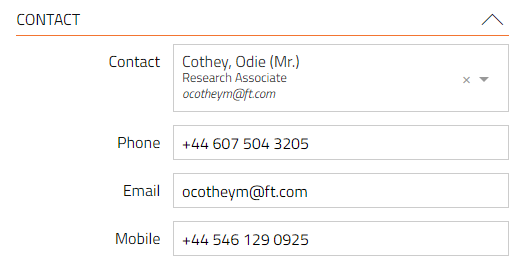
- In the “Contact” field, if the automatically populated details are not correct, you can select another Contact from the list of Contacts associated with the Site. Type a search term and the matching Contacts will be displayed in a drop-down picklist below. The search function will look for any matching text within the Contact data. You can also click anywhere on the input box to look for a contact and scroll within it.
- Select a Contact from the picklist by clicking on it. This will populate the following communications fields, if this data exists in the Contact record.
- If you wish to manually enter a contact's name (and any of the following communications details), you can manually type these in by clicking on the cross in the input box. To accept your inputted text, you need to click on Use Custom Value in the drop-down picklist. You can also edit any data pulled from the Contact file too.
- In the Asset/Equipment section, you set the Equipment to be worked upon. By selecting Equipment, this determines and may set further information about billing and any Service Levels applicable if it is associated with an Agreement.
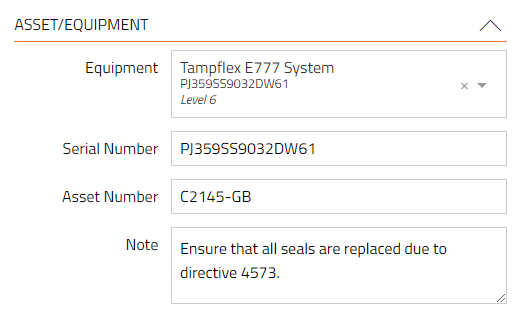
- In the Equipment field, you can select an Equipment item from the list of Equipment associated with the Site. Type a search term and the matching Equipment will be displayed in a drop-down picklist below. The search function will look for any matching text within the three fields displayed. You can also click anywhere on the input box to look for an Equipment item and scroll within it.
- Select an Equipment item from the list by clicking on it. This will populate the Product, Serial Number and Asset Number fields, if this data exists in the Equipment record.
- If you wish to manually enter details of equipment, you can manually type these in by clicking on the cross in the input box. This will clear the existing data and allow you to type in a name of the equipment or item to be worked upon. To accept your inputted text, you need to click on Use Custom Value in the picklist. You can also edit any data pulled from the Equipment file too.
Note: If you choose to manually input equipment information, then the system is unable to automatically determine any derived financial/billing or service level settings.
- In the Task section, you record details of the work to do including option to select a prescribed Action.
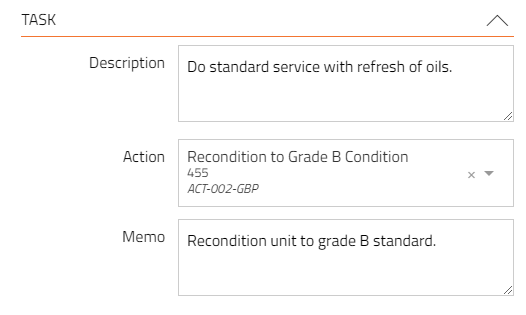
- In the Description field you can optionally enter additional text to describe the task in more detail.
- In the Action field, type a search term and the matching Actions will be displayed in a drop-down picklist below. The search function will look for any matching text within the Action data. You can also click anywhere on the input box to look for a Action and scroll down to view all available Actions.
- Select an Action from the list by clicking on it. This will then populate the field automatically. If an Action has a charge set for it, the Charge field in the later Financial section will be updated. If it has an Expected Duration set, this will also be set in the Duration (Hours) field in the later Schedule section.
- In the Memo field you can enter additional text to describe the required actions/tasks/work in more detail. If the Action record’s Memo field contains text, this will be automatically populated into this field.
- In the Schedule section, you can optionally record details of when the work should be done i.e. requested. The expected duration of the work can also be set here too. The duration field may be defaulted from an Action if this has been set. This information is used to assist users schedule and plan work later.
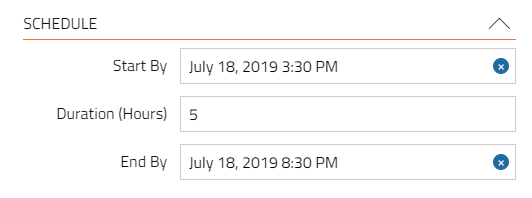
- In the Start By field, you store the date and time requested (this does not schedule resource for the work; only sets the requested date/time). Click on the field to display a date/time picker, allowing selection of dates via a calendar style input. Clicking on a date selects the date. You can scroll around the calendar using the arrows on near the top. To the right is a time selector; you can scroll to find the desired time.
- In the Duration (Hours) field you can set the expected duration of work in hours. If you selected an Action, this may be populated automatically.
- In the End By field, you store the date and time requested for the work to be completed. Click on the field to display a date/time picker, allowing selection of dates via a calendar style input. You can scroll around the calendar using the arrows on near the top. To the right is a time selector; you can scroll to find the desired time.
- In the Criteria section, you can optionally add criteria to the work item to restrict the candidates for scheduling the work to. For example, you may wish to add a specific Skill or a Certification. Normally you would NOT need to update these fields as these will be automatically updated when the work item is saved (this can be edited later as well).
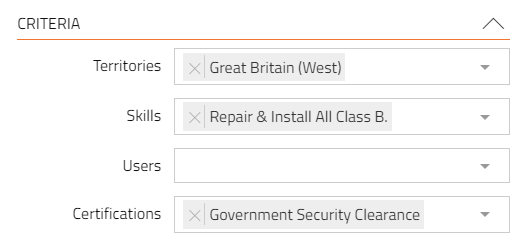
- In the Territories field, you can add one or more Territories where candidate users should be selected from. Click on the field to display a list of available Territories. If you make a mistake, you can delete it by clicking on the cross to the left of each Territory. If Territories are setup correctly and Site addresses are properly entered, this will automatically be determined anyway when the work item is saved.
- In the Skills field, you can add one or more Skills that candidate users should have to be considered as a candidate for the work. Click on the field to display a list of available Skills. If you make a mistake, you can delete it by clicking on the cross to the left of each Territory. If Skills are setup correctly and assigned to Users, these will automatically be set when the work item is saved.
- In the Users field, you can add one or more Users that should be preferred candidates for the work to be assigned to. Click on the field to display a list of available Users. If you make a mistake, you can delete it by clicking on the cross to the left of each User. If Preferred Users are setup correctly for each Site/Customer, it will automatically bet set when the work item is saved.
- In the Certifications field, you can add one or more Certifications that candidate users should have to be considered as a candidate for the work. Click on the field to display a list of available Certifications. If you make a mistake, you can delete it by clicking on the cross to the left of each Territory. If Certifications are setup correctly and assigned to Users, these will automatically be set anyway when the work item is saved.
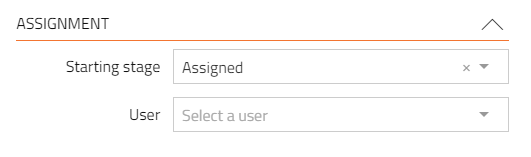
- In the Assignment section, you can optionally change the workflow stage and if the stage allows a user to be assigned, assigned a user to the work item.
-
- In the Starting Stage field, you can change the starting workflow stage for the work item (normally the starting stage is “Unassigned”). The Unassigned stage does not allow a user to be assigned.
- If you want to assign a specific user immediately, you can do this by choosing a stage that is setup to allow a user to be assigned e.g. "Assigned". Click on the Starting Stage box and a drop-down picklist will be displayed showing all available workflow stages. Select a relevant stage then underneath a box will appear allowing selection of a User.
- You can type in matching text to filter the list if users displayed. Clicking on a user will select it.
-
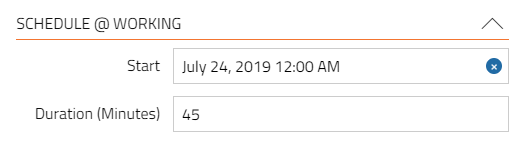
- In this specific work item template, there is one “Working” workflow stage that is defined to be a scheduled stage i.e. have a date/time & duration. This section will be automatically populated when the work item is scheduled using the Calendar to a specific User. The date/time is shown in the Schedule @ Working section.
- To create the work item, click on the Create button. If you wish to abort and not create a work item, click the Cancel button.