Associated Feature(s):
- FEA002 - Launching The Planner and familiarisation.
Associated Tutorial Videos:
Launching The Planner
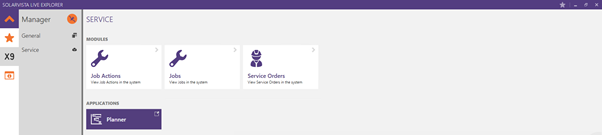
Access to the Planner application is from the X9 Manager Taskbar in Solarvista Live Explorer and then via the Service TAB to display the Service icons and Applications. The Planner icon is located under the Application heading, click on the icon to open the Planner application in a new window.
The Essentials edition of Solarvista LIVE Planner will be launched showing a Master (Global) planner view. This Master Planner view includes all Personnel, Territories, Teams, Departments and also Service Order and Job Categories and All Job Priorities. Further editions of Solarvista Live have the ability to configure user Planner views.
The Solarvista LIVE Planner application will refresh automatically under certain actions, for example dragging and dropping a job from the unassigned job list onto the Stack or Diary. This help file explains further methods of setting up the auto-refresh or how to force a data refresh.
The Solarvista LIVE Planner application is split into four main windows (see Figure 2 below). These are briefly explained below the Figure with more detail added later in this help file. These windows automatically display and enable vertical/horizontal scroll bars if there is too much information to display in the window area available.
- Personnel list.
- Stack
- Diary
- Unassigned Action list
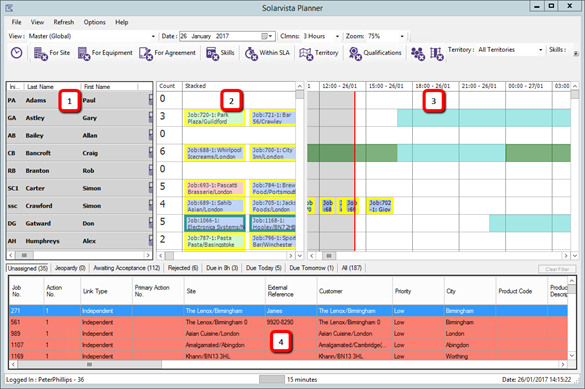
1. Personnel
Personnel will be listed in Last Name ascending alphabetical order, a scroll bar will be displayed to scroll to the right to display further information. It is possible to open a personnel record by double click while hovering the mouse pointer on the relevant record.
2. Stack
The Stack section is for actions that do not need to be completed at a specific time.
The action will be allocated as an unscheduled appointment. A count of job actions allocated to personnel is shown in the Count column in the Stack window. Further job action details can be displayed if enabled and configured. To display this information, hover the mouse pointer over the Job graphic – a pop up box will be displayed with the configured details. This configuration is explained further in this document. There are also two further options menus available from a mouse right click while hovering the pointer on a job graphic, or from a mouse right click while hovering the pointer over whitespace in the Stack. These option menus are explained later in this help file.
3. Diary
The Diary section is for actions that need to be completed at a specific time.
The action will be allocated as a scheduled appointment. The vertical red line is known as the ‘Now’ line and represents the current server time. Further job action details can be displayed if enabled and configured. To display this information, hover the mouse pointer over the Job graphic – a pop up box will be displayed with the configured details. This configuration is explained further in this document. There is also a list of menu options from a mouse right click while hovering the pointer on a job graphic, this is also explained later.
The diary can also show shifts and appointments set up in Solarvista X9 Explorer if these are used.
Scroll bar and other features (explained later) are available to move to future dates / times and see job action allocations.
There are four further options menus available from a mouse right click while hovering the mouse pointer over various areas on the Diary window, a job graphic, a shift, an appointment or while hovering over whitespace in the Diary. These option menus are explained later in this help file.
4. Unassigned Action List
This list of unassigned job actions is effectively the work pool that needs to be consumed. The bracketed number next to the label indicates the number of actions on the TAB. There is a scroll bar to display further information not on the view to the right. It is also possible to hide unwanted columns from the view (explained later).
The Job action details hover is not available within the unassigned actions list, however a double mouse click while hovering the pointer on the relevant job action line will open a read only Job action summary dialogue for further job action details.
There are other TABs available on this window, Jeopardy, Awaiting Acceptance, Rejected etc. These TABs display actions meeting particular criteria indicated by the TAB label, the TABs also indicate the number of actions on these TABs in brackets after the TAB label.
All the above planner windows are resizable and configurable using window dividers and top line File menu options.
The window dividers are shown in Figure 3 as vertical green lines between windows 1 & 2, windows 2 & 3 and a horizontal green line above window 4. To resize a window place the mouse pointer over the divider and the pointer will change from an arrow to a vertical/horizontal resizer, hold the left mouse button down and drag/drop the window to the required size.
In addition to resizing the windows vertical/horizontal scroll bars are automatically displayed if the window cannot display all items.
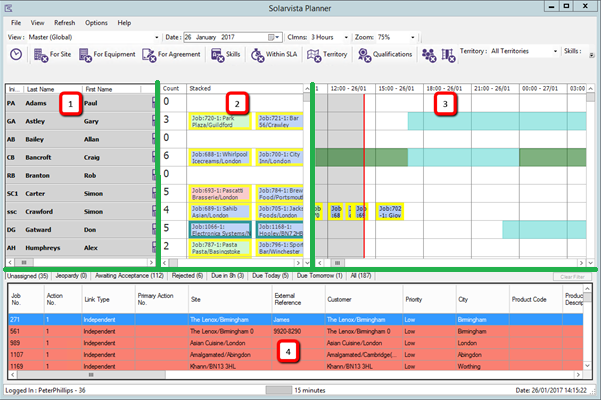
The bottom line of the screen is a status bar, this shows the username and UID who is logged in , the refresh window period and the current server date/time. This status bar can be turned off (made invisible) if not required which is explained later. A Solarvista LIVE Planner refresh can be forced by the user by clicking in the refresh period window, a green progress indicator will display during the data refresh.
Top Level Menu options
The top level menu options are shown in the Figure below, the menu options are displayed by a left mouse click while hovering the mouse pointer over the relevant word for example ‘File’ The options are self-explanatory or can be toggled On/Off. Some menu options have flyout menus that appear when hovering the mouse pointer over the relevant option, these are indicated by a right pointing arrowhead.

File Menu options
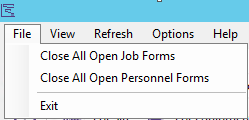
These are three options under the top level File option, opening the Job or Personnel forms is explained earlier in this help file.
The Exit option will close the Solarvista LIVE Planner application, the application will save all user settings if the Save Settings on Exit option is checked (see Options menu below)
View Menu Options
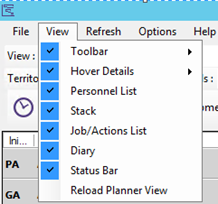
This option predominantly controls the visibility of the Windows, Toolbars and Filters employed by the Solarvista LIVE Planner application. If an option is Checked, it is visible, unchecked is not visible. The visibility of an option is changed by left mouse click while the mouse pointer is hovering over the relevant option. e.g. if you uncheck the Stack option by left click while mouse pointer is hovering over the work ‘Stack’ in the list. The view options will close and the Solarvista LIVE Planner application will display without the Stack window. To enable the Stack again repeat the above process.
Toolbar option has a fly out menu to control the visibility and size of the Toolbar, Icons and Filters.
Hover option has a fly out menu to control the visibility of the Job action additional information displayed by hovering the mouse pointer over a Job action graphic when this is enabled.
It is worth experimenting with the above options to see the effect of checking/unchecking various options and items.
The Reload Planner View option is used to clear all Solarvista LIVE Planner windows of information and get this information again from the database. Note this is different to a data refresh which refreshes the data for those items displayed only.
Refresh Menu Options

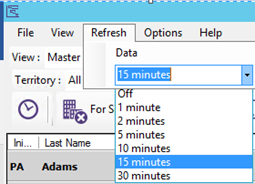
This option controls if the Solarvista LIVE Planner refresh is enabled (On/Off) and if On the rate of automatic refresh. There are several time intervals to cater for various installations.
The value selected is displayed next to the Refresh button on the Status Bar at the bottom of the screen.
It is also possible to perform a data refresh by left mouse click on Refresh followed by left mouse click on Data, The refresh window on the status bar will indicate refresh progress.
Options Menu

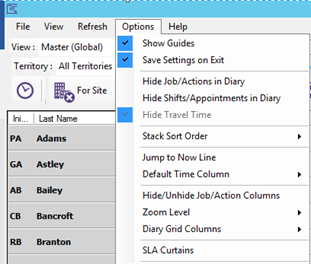
This is a list of further options that are available, some of them are also available elsewhere within the application, from icons or mouse click menus. Where this is the case it will have been detailed earlier in the help file or may be detailed later.
Show Guides, this option is only used on the Diary window when a job action is dragged onto or repositioned within the Diary window.
The guides display as thin blue lines emanating from the start of the job action graphic vertically and the middle of the job action graphic horizontally. The vertical Guide displays the expected start time within the Diary time columns at the top of the Diary window.
The purpose of these guides are to assist in determining the drop point when dragging or repositioning a job action graphic
Save Settings on Exit – if this is checked the Solarvista LIVE Planner users settings are stored in the database when the application is exited. When the application is launched again the user settings are applied to the session.
Hide Job/Actions in Diary – this options hide Job/Actions but leave the Appointments and shifts visible in the Diary window.
Hide Shifts/Appointments in Diary – this is the reverse of the option above the Shifts/Appointments are hidden and the Job/Actions remain visible.
Hide Travel Time – this option is not available within the Solarvista Live Essentials edition of the application.
Stack Sort Order – this shows the current sort order of the job actions in the Stack window, there are several sort options available, but only one is active. i.e. it not possible to sort on more than 1 level.
This option is also available easier by a right mouse click while hovering the mouse pointer over whitespace in the Stack window.
Jump to Now Line – this option returns the Diary window to show the now line. It is used when looking forwards, or backwards on the Solarvista LIVE Planner application and the current date/time is not displayed.
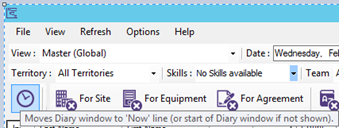
This option is also available easier by a left mouse click while hovering the mouse pointer on the Now Line icon shown in figure above.
Default Time Column – To Be Added Later
Hide/Unhide Job/Actions Columns – this option controls the column list displayed in the Unassigned Action Window.
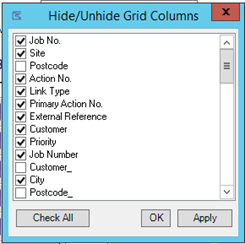
The list of available job action display items is listed in the dialogue box with scroll bar to move up/down the list. When an item is Checked, it is displayed in the Unassigned Action List and other TABs, Unchecked items are not displayed.
There is a Check All button to quickly check all display items. Click the OK or Apply button make the changes.
It is also possible to display this feature by right mouse click while hovering the mouse pointer on any column heading on any Unassigned Action Window TAB and clicking the Unhide Columns button.
Zoom Levels – this option only operates on the Diary window. It is used to Zoom into the job action columns and expands or closes the column width based on the setting selected.
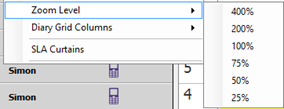
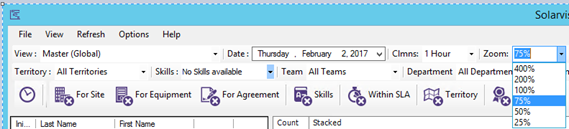
The option is also available easier from the Toolbar if displayed (see Figure below), the current Zoom value is displayed and the drop down list can easily be expanded and the value selected. The changes are made immediately.
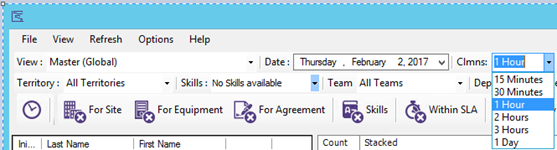
Diary Grid Columns – this option only operates on the Diary window. It is used to show the timespan of the Diary window columns (between the grid lines).
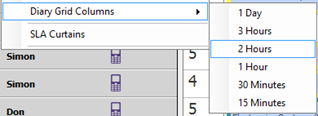
The option is also available easier from the Toolbar if displayed (see Figure below), the current Column value is displayed and the drop down list can easily be expanded and the value selected. The changes are made immediately
SLA Curtains – this option is not available within the Solarvista Live Essentials edition of the application.