Customers
A detailed look at the fields and dependencies in the Customer records, how to create a new Customer record & editing existing Customer records.

The Customer records are where you store information about your customers, clients, accounts and indeed any entity that you provide service to.
Some features are dependent upon your select plan for your account.
Indicates a feature is only available in Standard plan or above.
Indicates a feature is only available in Enterprise plan.

If you intend to use Solarvista to compute billing ![]() , it also holds preferred billing rules, currency and default tax rate.
, it also holds preferred billing rules, currency and default tax rate.
Preferences can be setup for preferred operatives (Users), and Certifications ![]() required for operative attending any Site of the Customer.
required for operative attending any Site of the Customer.
It should be noted that another record type, Sites, exists to hold multiple address locations for a Customer, which, via the Equipment records, can have equipment or assets related.
It should not be confused with ‘Sites’ which are used to record physical locations of work. For example:
- A customer with one location, would have a Customer record and one equivalent Site record for the same address.
- A customer with say, a head office and eight branch locations, would have one Customer record and eight separate Site records.
It would be typical to have one Customer record for each ‘account’ you have. The Customer record holds other information relevant to the entity or account but it’s not necessary to input these if you don’t need them.
Where Customers Records are Used
The following files refer to Customer records so if you plan to use any of these setting up Customers will be important or critical.
Work Items:
- Generic Job
- Field Repair
- Depot Repair
- Installation
- Field Maintenance
- Survey
- Field Task
- Help Desk Call
Data Sources:
- Site
- Contact
- Agreement

- Recurring Work

- Invoice

- Project
Prerequisite Files for Customers
When setting up customer records, it is recommended to review the other data files that may need to be referred to by each Customer record. Often the Customer file is one of the last to setup given the other information that is potentially referred to (which is quite a lot if using all aspects of the system).
These are the files that you may need to setup in advance of the Customer records:
- Certifications

- Opening Times

- Users
- Service Levels

- Pricing Policies

- Currencies

- Tax Rates*
- Categories (Customer)
- Industries
- Contacts
- Territories

Field Descriptions for Customers
The ID section holds the unique ID and names for the customer:
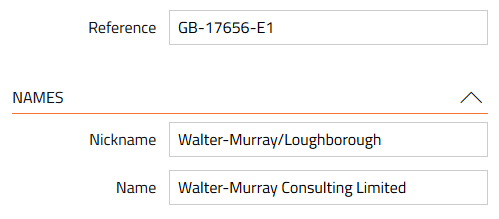
Reference - holds the unique ID for the record (most records in Solarvista have one of these). It cannot contain any spaces or non-standard characters. Once the record is saved, it is not possible to edit it afterwards. In most default situations, the Reference is automatically set using a counter sequence, however, you can setup your own if you prefer.
Nickname - this is used to identify the customer in a compact and easy to read way. It is used within pick lists within the software as well as in areas where screen space is restricted. This field should be short, but unique enough for a user to identify the Customer.
Name - the formal name of the customer/client e.g. ABC Systems Limited, XYZ Metals Inc. etc.
The Address section holds the physical address of the customer:
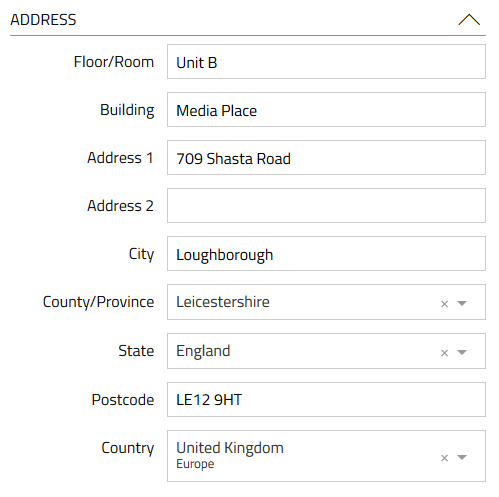
Floor/Room– the floor, room or location within the building or site.
Building - the building name or number of unit on site.
Address 1 – first line of address.
Address 2 – optional second line of address (not including city or town name).
City – name of town or city.
County/Province – name of county or province. This is dependent upon State field selection (which in turn is dependent upon Country selection). This should be populated if you plan to use Counties/Provinces to define Territories.
Postcode – the postal code or zip code of the site. This should be populated if you plan to use Postcodes to define Territories.
State – name of state (if applicable). This is dependent upon Country field selection. This should be populated if you plan to use States to define Territories.
Country – name of country. This field defaults to the setting in Account Settings and must be selected from the in-built list of countries. This should be populated if you plan to use Countries to define Territories.
The Communications section holds the preferred contact and the customer’s phone/email:
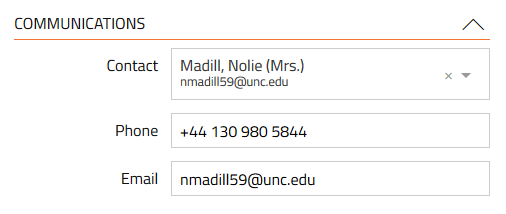
Contact –allows selection of a preferred/primary contact from the Contacts file. Alternatively, it allows a free text name to be typed into the field.
Phone – will automatically populate with the phone information from a selected contact. It is also possible to enter a phone number directly. If this is a new Customer record, Solarvista will automatically create a Contact record after you save the record and populate whatever is entered here into the Contact record.
Email – will automatically populate with the email address information from a selected contact. It is also possible to enter an email address directly. If this is a new Customer record, Solarvista will automatically create a Contact record after you save the record and populate whatever is entered here into the Contact record.
The Preferred section holds preferred defaults for the customer and related sites:
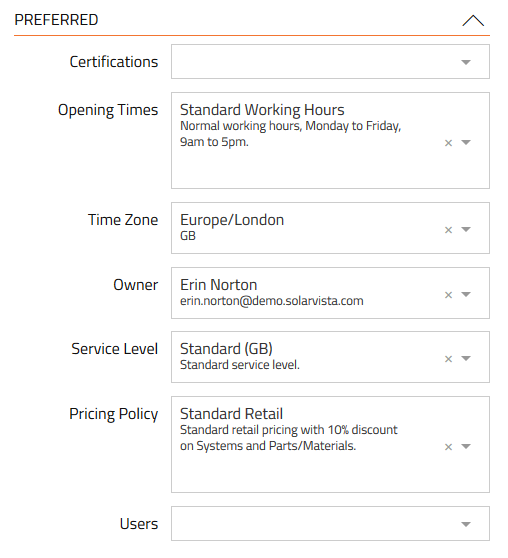
Certifications ![]() - if Certifications are entered, Solarvista can use these to assist users in planning work for this customer. For example, a customer may require that attendees have “Security Clearance” and if this is entered here, when the Calendar is used to assist with planning work, only users with the specific Certifications will be presented.
- if Certifications are entered, Solarvista can use these to assist users in planning work for this customer. For example, a customer may require that attendees have “Security Clearance” and if this is entered here, when the Calendar is used to assist with planning work, only users with the specific Certifications will be presented.
Opening Times ![]() – holds the Opening Times pattern for the customer and normally defaults to the setting in Account Settings. You must create a specific Opening Times record to contain these changes if different from standard.
– holds the Opening Times pattern for the customer and normally defaults to the setting in Account Settings. You must create a specific Opening Times record to contain these changes if different from standard.
Time Zone ![]() - holds the time zone for the customer and is defaulted from Account Settings. However, changing the State/County/Province/Country fields in the Address section will also update this. Time zones are used to allow service levels to be computed correctly and/or times to be input or displayed in the locality relevant.
- holds the time zone for the customer and is defaulted from Account Settings. However, changing the State/County/Province/Country fields in the Address section will also update this. Time zones are used to allow service levels to be computed correctly and/or times to be input or displayed in the locality relevant.
Owner – allows a user within Solarvista to be assigned to a customer, for example an “account manager” who may be responsible for the customer. This is used within some views to filter customers for specific users.
Service Level ![]() – allows a Service Level to be specified as a default for Work Items (i.e. Jobs) created for the customer. This field itself is defaulted from Account Settings. Service Levels define how quickly (and when) service is provided to a customer in scenarios where ‘response times’ etc. are valid.
– allows a Service Level to be specified as a default for Work Items (i.e. Jobs) created for the customer. This field itself is defaulted from Account Settings. Service Levels define how quickly (and when) service is provided to a customer in scenarios where ‘response times’ etc. are valid.
Pricing Policy ![]() – allows a Pricing Policy to be specified as a default for Work Items (i.e. Jobs) created for the customer. This field itself is defaulted from Account Settings. Pricing Policies define how billing is computed for the chargeable types of work.
– allows a Pricing Policy to be specified as a default for Work Items (i.e. Jobs) created for the customer. This field itself is defaulted from Account Settings. Pricing Policies define how billing is computed for the chargeable types of work.
Users – allows a list of Users to be specified as ‘preferred’ for Work Items created for the customer. This information can be used to filter within the Calendar when scheduling work to be done.
The Financial section holds key information related to billing ![]() . It’s not necessary to set these fields if you do not intend to generate billing from Solarvista:
. It’s not necessary to set these fields if you do not intend to generate billing from Solarvista:
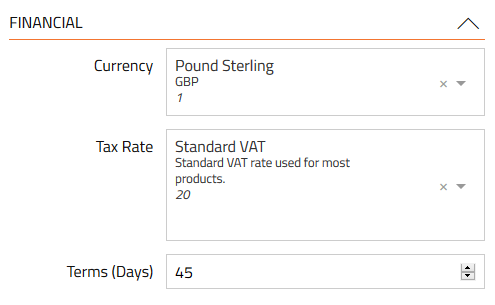
Currency ![]() – holds the Currency that billing data and/or invoices generated should be in. This field is itself defaulted from the setting in Account Settings. Currencies are pre-populated in Solarvista for most countries’ currencies, but these should be edited to ensure the rates and codes are correct before use.
– holds the Currency that billing data and/or invoices generated should be in. This field is itself defaulted from the setting in Account Settings. Currencies are pre-populated in Solarvista for most countries’ currencies, but these should be edited to ensure the rates and codes are correct before use.
Tax Rate ![]() – holds the default Tax Rate to be applied to invoices where not specified by the product or service. This field is itself defaulted from the setting in Account Settings. Tax Rates are pre-populated for selected countries and should be edited to ensure the rates and codes are correct before use.
– holds the default Tax Rate to be applied to invoices where not specified by the product or service. This field is itself defaulted from the setting in Account Settings. Tax Rates are pre-populated for selected countries and should be edited to ensure the rates and codes are correct before use.
Terms (Days) ![]() – holds the number of days allowed for payments to be expected. This date is calculated with each invoice generated.
– holds the number of days allowed for payments to be expected. This date is calculated with each invoice generated.
The Other section holds miscellaneous additional information:
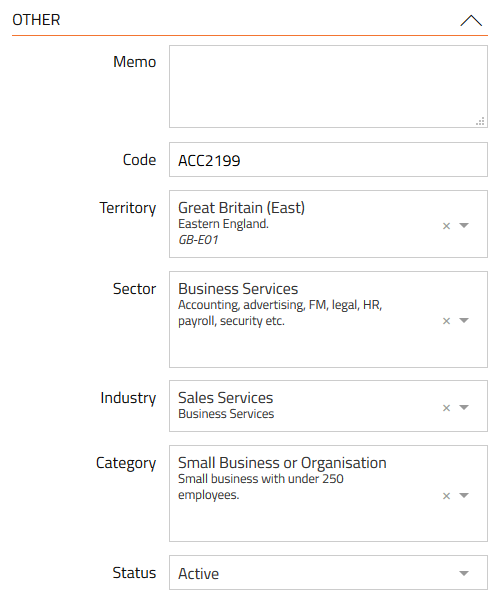
Memo – a free text field that can be used for any purpose.
Code – used to hold an optional alternative ID code. This may be applicable in situations where information is being transferred to other systems via Connectors and the code here is used to identify the record to the other system.
Territory ![]() – holds a specific Territory classification for the site to assist in planning features e.g. the Calendar.
– holds a specific Territory classification for the site to assist in planning features e.g. the Calendar.
Sector – a high-level selection of industry sector and is pre-populated with choices from the Categories file. Selection of a Sector applies filters the next field, Industry.
Industry – a more detailed, lower level classification of industry taken from the Industries file. These are pre-populated with a ready-made set of classifications however, the previous field, Sector, must be selected first.
Category – a category for the customer e.g. ‘Large”, “Small”, “Grade A” etc. These are defined in the Categories file and set with a Type= “Customer”.
Status – defines whether the record is in use or not. Initially, records are set to a status of “Draft”. Only “Active” status records are available for selection within the Solarvista system.
Creating a New Customer Record
To create a new Customer record:
- Click on the “Plus” button.

The new menu will appear. - Within the “Data Sources” section, find “Customer”.

- Click on “Customer”. A new “empty” Customer record will appear.
- Populate all fields as you require (refer to descriptions above).
- Click on the “Create” button.

- You may need to refresh the page to see the new record in a view using the Refresh button on the top bar.

Editing a Customer Record
To edit a Customer record:
- From the main menu, select Customer.

The default view for Customers will open. - Click on the Quick Filter button. The Quick Filter slide-in pane will open.

- Enter criteria for the Customer record you are looking for and click Apply button.

The view will update. - Find the record you are wanting to edit.
- Click anywhere on the row that shows the record. The record will open.
- You can edit any field that allows editing (some could be set to read only).
- Click on “Save” button to save changes.

Deleting a Customer Record
To delete a Customer record.
- From the main menu, select Customers. The default view for Customers will open.
- Click on the Quick Filter button. The Quick Filter slide-in pane will open.

- Enter criteria for the Customer record you are looking for and click Apply button.

- The view will update. Find the record you are wanting to delete.
- On the left side of the view is a column containing check boxes.
- Check the box of the record (or records) you want to delete.
- Click the “Delete” button on the top right.

A slide in dialog will appear prompting you to confirm the delete, by typing in the word “DELETE” again. - To confirm, click the “Delete” button and the record (or records) will be deleted.

Note: You cannot delete a Customer record that is already in use with a Work Item. You can delete Customer records referred to by other Data Sources, however this will leave those records without an associated to a valid Customer record. If this happens by accident, you can manually recreate the record ensuring the Reference is identical. You can also change the status of the record to prevent it appearing on screen in future whilst maintaining historical integrity.
Customising or Adding New Fields
Solarvista™ is built upon a uniquely flexible platform that allows you to edit fields (or remove them in some cases) as well as add your own fields. These new fields (or edited characteristics of existing fields) automatically become available within the web portal and the mobile apps. For more information, refer to the Customising section.
Importing Customer Data in Bulk using Import Tool
If you have a lot of customer information to enter, you may prefer to upload this using the Import Tool that’s built into Solarvista. The Import Tool enables Customer records to be created from “CSV” text files. CSV files can be created from a wide range of popular applications including Microsoft Excel. You should create all related data files before you create the Customer data so that you can populate the appropriate fields with the correct References (ID fields). For more information on importing data into Solarvista, please refer to the article here.