All Work Items follow a workflow that is specifically designed for each type of Work Item (as defined by the Work Item Templates). Users are forced to strictly follow the workflow design for each. In the mobile app, this is done by the appearance of "Workflow Stage Buttons" on the Activity tab of each Work Item.
Viewing the Workflow for each Work Item
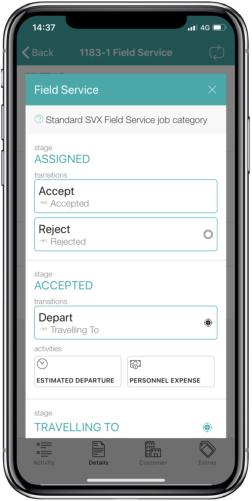
If you need to check the design of a workflow for a work item that is currently open, you can tap the "Workflow" section on the Details tab. This will launch an overlay window where you can scroll through to see the full set of stages, with each transition option for each and all optional and mandatory Activities/Forms for each stage.
Transitioning a Work Item to another Stage
To move a Work Item from the current stage to the next stage:
- Open the Work Item that you wish to change workflow stage.
- The "Activity" tab should be opened by default (if not, tap the Activity tab at the bottom).
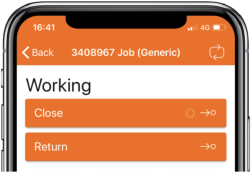
- At the top of the page, you will see the current workflow stage name displayed and the available options for the next possible stages displayed as buttons. In the example below, the current stage is "Working" and the available transitions to next workflow stages are "Close" and "Return".
- Tap on the desired workflow transition button. A prompt to confirm will appear.
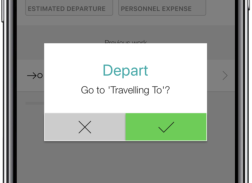
- Confirm that the selected transition is correct and that you wish to proceed by tapping on the Continue button ("tick") or abort by tapping the Cancel button ("cross").
- Once confirmed, the transition will be applied and a new set of workflow stage buttons will appear (along with new set of Activities/Forms too).